We have already mentioned many times on this blog how important it is to perform regular firmware updates. Therefore, updating Typhoon Q500 4k firmware will give new features to your drone and in some cases fix software bugs.
If you have never done a firmware update before, in this article we will guide you through how you should do it. Once you make the update for the first time, you will be ready for each new update on your Typhoon 4k drone and ST10 remote controller. We’ll start with a step-by-step guide and walk you through all the processes on how to update Typhoon Q500 4k firmware. So let’s start!
For those who want to see a full review of this model, you can read Yuneec Typhoon Q500 4k Review.
Firmware Update Process For Typhoon Q500 4k
These are the steps required to perform a firmware update on the Q500 model.
- By using your Computer, Install the Q500 GUI app.
- Find and download FTDI CDM USB drivers for Q500
- Install the latest firmware update for Typhoon Q500 and ST10 RC.
- Update the Typhoon Q500 firmware
- Update the ST10 RC firmware
Below we will explain in our step-by-step guide on how to perform this update. At the end of this article we left you an interesting video on how you can update Typhoon Q500 4k firmware.
Yuneec Typhoon Q500 4k Firmware Update Process
- Choose the version of Q500 software depending on the operating system you have (Mac or Win) and download it.
- Install the Typhoon Q500 GUI software. You can find it here: Yuneec Q5 downloads.
- After you downloaded and Installed the Q500 GUI software, follow the steps.
- Find and open the Typhoon Q500 GUI software on your PC or Mac.
- On the screen you will get the following notification: “If your PC doesn’t have the USB driver installed, install the latest version and restart your PC”. (This step is usually skipped, because most computers have USD drivers).
- By clicking on the following link you will be on Port Drivers See what operating system you have and click on it.
- After the download is complete, tap on FTDI CDM package, extract it, and install on your PC.
- Now go back to Q500 website, scroll and find the “Drone Firmware”. Download and install the latest firmware version.
- Next step is to download the ST10 Remote Controller firmware to your PC. This file is larger than the previous, and has over 100 MB.
- When you download the file, plug the USB stick that came with Typhoon Q500 drone.
- Connect the USB wire with the wire in the battery compartment that is located at the back of the drone.
- Remove the battery from the drone. Now use a tweezer to pull the wire out that is located in the battery compartment.
- Now you need to separate that 2 wires that you have pulled out.
- Use your USB cable and connect it to the computer into the one of the wires that you have just separated.
- Open the Q500 GUI software on your PC and wait for the software to do a system test on the drone.
- Now tap on “Device Information” that is on the left column of Q500 software and click on “Firmware Update”.
- Find the location where the firmware file is downloaded and open the file.
- Tap on “Update” button and wait until the progress bar comes to 100%.
- After the process is completed, click Finish and restart your Typhoon Q500 drone.
- When the restart is done, verify the Typhoon Q500 by going into the “Device Information” tab icon in the Q500 software.
- Last step is to turn off the Q500 drone, remove the battery, disconnect the USB cable and re-attach the separated cables back to the place where the battery compartment is. Put back the battery and your finished.
This is the whole process of updating the Typhoon Q500 4k firmware. If you have done this successfully, we still have to update the ST10 remote controller. So stay tuned.
Also if you have problems with Phantom 3 and 4 firmware updates, read our guide on DJI Phantom 3 Firmware Update and How To Update DJI Phantom 4 Firmware.
Yuneec ST10 Remote Controller Firmware Update
Now we will guide you on how to update the firmware on your Yuneec ST10 remote controller.
Yuneec ST10 Transmitter Firmware Update Process
- Use your microSD card together with an SD adapter and connect it to your PC.
- Unzip the ST10 firmware update that you have downloaded. The folder will be created under the name “Firmware” and “update.zip”.
- Do not extract “update.zip” file.
- The document that has “tx” should not be renamed because it consists with “bin” file.
- On your empty microSD card copy the “Firmware” and “update.zip” files directly (without folder).
- Make sure that the battery is out of ST10 Remote Controller when you insert the microSD card.
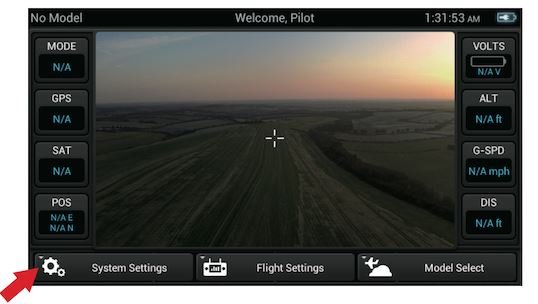
- Now turn on the ST10 RC, and select “System Settings” and confirm with OK.
- Tap on the “Flight Mode Control”, scroll down and find the “Radio Control Update”. Now select “tx” and “RF” file.
- Now click on “Update TX” and confirm with OK. Repeat the step and click “Update RF” and confirm with OK. Click on Finish.
- Find and select the “System Update” and tap on OK.
- The update process will take 1 minute and the Remote Controller will reboot.
- After the process is finished, check to see if the update was successful. Check for “Build Number”.
We have prepared an interesting video where you can see the whole process of updating the Typhoon 4k firmware.
We also wrote the firmware update process for DJI Mavic Air 2.
Conclusion
The process of updating new firmware on your drone is not as complicated as it seems at first. As you could see in this article this process only takes a few minutes and it is very important to do regular updates so the drone won’t have software bugs. If you have any questions, feel free to contact us.